Smartphone-operated RGB LED Strip
In the previous article of this series, we learned how to change colors in RGB LED strip using any IR remote means generating different colors in RGB LED strip with your fingertips from a remote place using any IR remote. So indeed, it was a very nice application.
This time again, we are moving one step ahead. Now in place of IR remote, I am using a smartphone. This means now I will generate different colors in RGB LED using a smartphone. I will set the RGB LED strip color from my smartphone.
There are few RGB LED strips available in the market; those are operated from an Android application in a smartphone (I remember one advertisement of SYSKA LED in which the LED light color was changed using a smartphone application). They are Bluetooth-operated strips. The RGB strips have inbuilt Bluetooth. The android application uses smartphone Bluetooth to send commands to RGB LED strip, and thus we can control RGB LED strip using our smartphone.
And what if I say that we can also make a smartphone-operated RGB LED strip using Arduino?
I think you all are very excited to make this!!!!!! So let’s start.
Here is the circuit diagram and its operation.
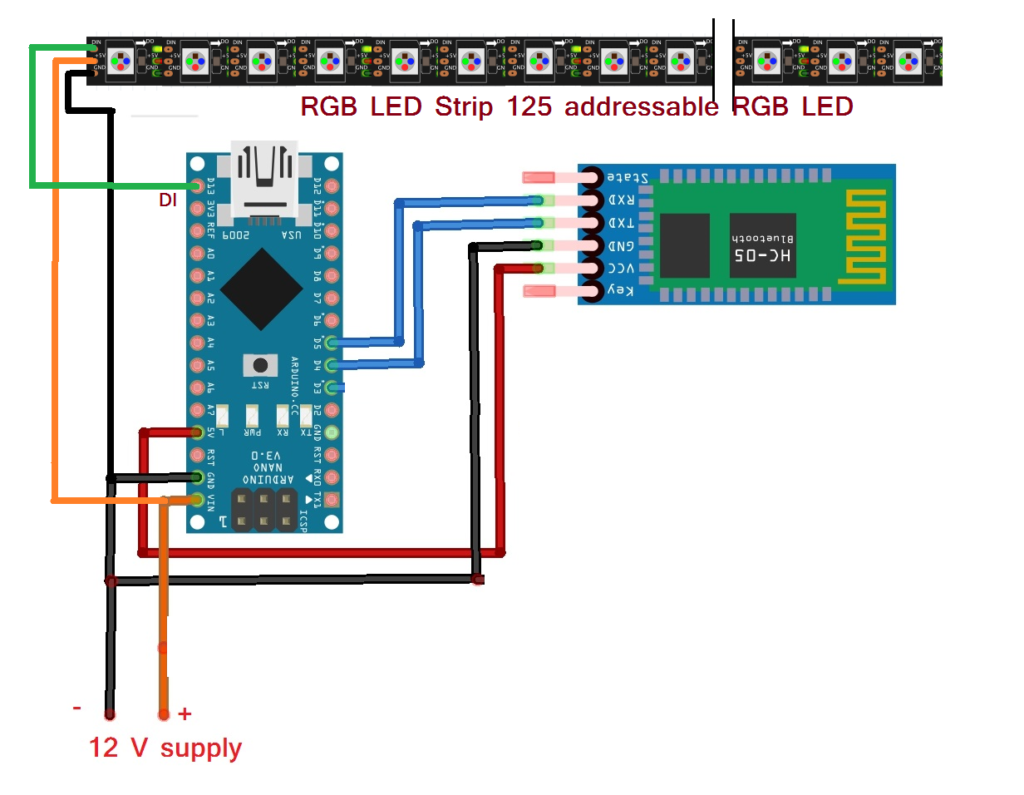
Circuit Diagram
The circuit is build using 3 components only. Bluetooth module (HC05), Arduino NANO board, and RGB LED strip. Here in this project, I have used addressable RGB LED (in the previous article of this series, I have used a normal RGB LED strip)
- RGB LED strip has only 3 wires for interfacing. (1) 12V (2) Gnd and (3) Din. Din pin is a data input pin that is connected with digital pin D13 of Arduino
- Both Arduino board and RGB Strip are given the same 12 V supply from the adapter.
- HC05 has 4 interfacing pins. (1) Vcc (2) Gnd (3) TXD and (4) RXD. Vcc pin is given a 5V supply from Arduino board. Gnd pin is connected to common ground. TXD and RXD pins are connected with digital pins D4 and D5
Circuit Operation
- When the supply is given to the circuit from an adapter, all LEDs in the strip are OFF. The HC05 module will start blinking to indicate it is searching for another Bluetooth device to which it will be paired (connected)
- The person, who wants to change the strip color, will first open an android application having Bluetooth data sending facility in his smartphone (you may get so many such applications in the Google play store. search for “Bluetooth for Arduino”). This application will search and pair with the HC05 module (for pairing 1st time, it is required to enter Bluetooth passkey for the HC05 module, which is by default 1234). When your smartphone get connected with the HC05 module, its blinking rate will be slow
- Now type and send the letter ‘R’ from the application. The phone Bluetooth will send this ‘R’ to the HC05 module.
- HC05 module will receive this ‘R’ and gives it to Arduino through serial communication
- When Arduino gets ‘R’, it will give data to the RGB strip to set RED color for all RGB LEDs in the strip, and the entire strip gets illuminated with RED .color
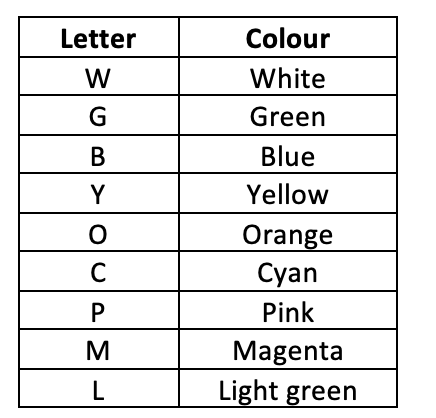
- Similarly, send the following letters from the android application for the desired color.
- Finally, to make strip OFF, send the letter ‘X’ from an application
Software Program: Smartphone operated RGB LED Strip Arduino program
| #include <FastLED.h> |
| #include <SoftwareSerial.h> |
|
|
| #define NUM_LEDS 40 |
| #define DATA_PIN1 13 |
|
|
| #define Tx_pin 4 |
| #define Rx_pin 5 |
|
|
| int i; |
| char recv_char; |
| CRGB led_strip1[NUM_LEDS]; |
| SoftwareSerial BT_serial(Rx_pin,Tx_pin); |
|
|
| void setup() |
| { |
| FastLED.addLeds<WS2811, DATA_PIN1, BRG>(led_strip1, NUM_LEDS); |
| for(i=0;i<NUM_LEDS;i++) {led_strip1[i] = CRGB::Red;} |
| FastLED.show(); |
| delay(1000); |
| for(i=0;i<NUM_LEDS;i++) {led_strip1[i] = CRGB::Green;} |
| FastLED.show(); |
| delay(1000); |
| for(i=0;i<NUM_LEDS;i++) {led_strip1[i] = CRGB::Blue;} |
| FastLED.show(); |
| delay(1000); |
| BT_serial.begin(9600); |
| BT_serial.println("select desire colour"); |
| } |
| void loop() |
| { |
| if(BT_serial.available()) |
| { |
| recv_char = BT_serial.read(); |
| BT_serial.println(recv_char); |
| switch(recv_char) |
| { |
| BT_serial.println(recv_char); |
| case 'R': |
| for(i=0;i<NUM_LEDS;i++) {led_strip1[i] = CRGB::Red;} |
| FastLED.show(); |
| break; |
| case 'Y': |
| for(i=0;i<NUM_LEDS;i++) {led_strip1[i] = CRGB::Yellow;} |
| FastLED.show(); |
| break; |
| case 'O': |
| for(i=0;i<NUM_LEDS;i++) {led_strip1[i] = CRGB::Orange;} |
| FastLED.show(); |
| break; |
| case 'G': |
| for(i=0;i<NUM_LEDS;i++) {led_strip1[i] = CRGB::Green;} |
| FastLED.show(); |
| break; |
| case 'L': |
| for(i=0;i<NUM_LEDS;i++) {led_strip1[i] = CRGB::LightGreen;} |
| FastLED.show(); |
| break; |
| case 'B': |
| for(i=0;i<NUM_LEDS;i++) {led_strip1[i] = CRGB::Blue;} |
| FastLED.show(); |
| break; |
| case 'S': |
| for(i=0;i<NUM_LEDS;i++) {led_strip1[i] = CRGB::SkyBlue;} |
| FastLED.show(); |
| break; |
| case 'C': |
| for(i=0;i<NUM_LEDS;i++) {led_strip1[i] = CRGB::Cyan;} |
| FastLED.show(); |
| break; |
| case 'P': |
| for(i=0;i<NUM_LEDS;i++) {led_strip1[i] = CRGB::Pink;} |
| FastLED.show(); |
| break; |
| case 'M': |
| for(i=0;i<NUM_LEDS;i++) {led_strip1[i] = CRGB::Magenta;} |
| FastLED.show(); |
| break; |
| case 'x': |
| for(i=0;i<NUM_LEDS;i++) {led_strip1[i] = CRGB::Black;} |
| FastLED.show(); |
| break; |
| case 'W': |
| for(i=0;i<NUM_LEDS;i++) {led_strip1[i] = CRGB::White;} |
| FastLED.show(); |
| break; |
| } |
| } |
| } |
And now, one last update
Let’s make this even more interesting!
Let’s make the RGB LED strip voice-operated. This means you speak the color, and the color is displayed on the strip. You say (speak) “BLUE” and the entire strip will turn into BLUE color
WOW……..!!!!
I think this the thing that everyone would like to have in his/her home. Speak of color, and your room light turns into that color.
And to make this you don’t need to do anything extra. It would be best if you had the same above circuit. Just download the “Arduino Bluetooth controller” app on your android phone from the Google play store. This application converts voice commands into text and sends them via phone Bluetooth to another device. The receiving device (HC05 in our case) will get the character string of our voice command.
So what you are supposed to do. Follow the step by step procedure
- Download and install the Arduino Bluetooth controller application
- Open the application. it will prompt you to turn ON your phone Bluetooth
- Turn ON phone Bluetooth
- Now the application wants you to find an available device. just click on “available device” and find the HC05 module
- Finally, connect with the HC05 module, and that’s it
- Download the following program in Arduino
| #include <FastLED.h> |
| #include <SoftwareSerial.h> |
|
|
| #define NUM_LEDS 43 |
| #define DATA_PIN1 4 |
|
|
| #define Tx_pin 3 |
| #define Rx_pin 2 |
|
|
| int i,j=0,k; |
| char recv_color_str[8]; |
| char red[4] = "red"; |
| char green[6] = "green"; |
| char blue[5] = "blue"; |
| char magenta[8] = "Magenta"; |
| char yellow[7] = "yellow"; |
| char orange[7] = "orange"; |
| char white[6] = "white"; |
| char purple[7] = "purple"; |
| char rainbow[8] = "rainbow"; |
| char black[6] = "black"; |
| CRGB led_strip1[NUM_LEDS]; |
| SoftwareSerial BT_serial(Rx_pin,Tx_pin); |
|
|
| void setup() |
| { |
| FastLED.addLeds<WS2811, DATA_PIN1, BRG>(led_strip1, NUM_LEDS); |
| for(i=0;i<NUM_LEDS;i++) {led_strip1[i] = CRGB::Red;} |
| FastLED.show(); |
| delay(1000); |
| for(i=0;i<NUM_LEDS;i++) {led_strip1[i] = CRGB::Green;} |
| FastLED.show(); |
| delay(1000); |
| for(i=0;i<NUM_LEDS;i++) {led_strip1[i] = CRGB::Blue;} |
| FastLED.show(); |
| delay(1000); |
| BT_serial.begin(9600); |
| // Serial.begin(9600); |
| //Serial.println("select desire colour"); |
| } |
| void loop() |
| { |
| while(BT_serial.available()) |
| { |
| if(BT_serial.available()>0) |
| { |
| recv_color_str[j] = BT_serial.read(); |
| Serial.print(recv_color_str[j]); |
| j++; |
| } |
| } |
| if(strcmp(recv_color_str,black)==0) |
| { |
| //Serial.println(recv_color_str); |
| for(i=0;i<NUM_LEDS;i++) {led_strip1[i] = CRGB::Black;} |
| FastLED.show(); |
| j=0; |
| for(k=0;k<8;k++) recv_color_str[k] = '\0'; |
| } |
| else if(strcmp(recv_color_str,red)==0) |
| { |
| //Serial.println(recv_color_str); |
| for(i=0;i<NUM_LEDS;i++) {led_strip1[i] = CRGB::Red;} |
| FastLED.show(); |
| j=0; |
| for(k=0;k<8;k++) recv_color_str[k] = '\0'; |
| } |
| else if(strcmp(recv_color_str,purple)==0) |
| { |
| // Serial.println(recv_color_str); |
| for(i=0;i<NUM_LEDS;i++) {led_strip1[i] = CRGB::Purple;} |
| FastLED.show(); |
| j=0; |
| for(k=0;k<8;k++) recv_color_str[k] = '\0'; |
| } |
| else if(strcmp(recv_color_str,white)==0) |
| { |
| // Serial.println(recv_color_str); |
| for(i=0;i<NUM_LEDS;i++) {led_strip1[i] = CRGB::White;} |
| FastLED.show(); |
| j=0; |
| for(k=0;k<8;k++) recv_color_str[k] = '\0'; |
| } |
| else if(strcmp(recv_color_str,green)==0) |
| { |
| // Serial.println(recv_color_str); |
| for(i=0;i<NUM_LEDS;i++) {led_strip1[i] = CRGB::Green;} |
| FastLED.show(); |
| j=0; |
| for(k=0;k<8;k++) recv_color_str[k] = '\0'; |
| } |
| else if(strcmp(recv_color_str,blue)==0) |
| { |
| // Serial.println(recv_color_str); |
| for(i=0;i<NUM_LEDS;i++) {led_strip1[i] = CRGB::Blue;} |
| FastLED.show(); |
| j=0; |
| for(k=0;k<8;k++) recv_color_str[k] = '\0'; |
| } |
| else if(strcmp(recv_color_str,yellow)==0) |
| { |
| //Serial.println(recv_color_str); |
| for(i=0;i<NUM_LEDS;i++) {led_strip1[i] = CRGB::Yellow;} |
| FastLED.show(); |
| j=0; |
| for(k=0;k<8;k++) recv_color_str[k] = '\0'; |
| } |
| else if(strcmp(recv_color_str,orange)==0) |
| { |
| // Serial.println(recv_color_str); |
| for(i=0;i<NUM_LEDS;i++) {led_strip1[i] = CRGB::Orange;} |
| FastLED.show(); |
| j=0; |
| for(k=0;k<8;k++) recv_color_str[k] = '\0'; |
| } |
| else if(strcmp(recv_color_str,magenta)==0) |
| { |
| //Serial.println(recv_color_str); |
| for(i=0;i<NUM_LEDS;i++) {led_strip1[i] = CRGB::Magenta;} |
| FastLED.show(); |
| j=0; |
| for(k=0;k<8;k++) recv_color_str[k] = '\0'; |
| } |
| else if(strcmp(recv_color_str,rainbow)==0) |
| { |
| //Serial.println(recv_color_str); |
| for(i=0;i<3;i++) {led_strip1[i] = CRGB::Yellow;} |
| for(i=3;i<6;i++) {led_strip1[i] = CRGB::Magenta;} |
| for(i=6;i<9;i++) {led_strip1[i] = CRGB::Orange;} |
| for(i=9;i<12;i++) {led_strip1[i] = CRGB::Blue;} |
| for(i=12;i<15;i++) {led_strip1[i] = CRGB::Green;} |
| for(i=15;i<18;i++) {led_strip1[i] = CRGB::Red;} |
| for(i=18;i<21;i++) {led_strip1[i] = CRGB::Cyan;} |
| for(i=21;i<24;i++) {led_strip1[i] = CRGB::Yellow;} |
| for(i=24;i<27;i++) {led_strip1[i] = CRGB::Magenta;} |
| for(i=27;i<30;i++) {led_strip1[i] = CRGB::Orange;} |
| for(i=30;i<33;i++) {led_strip1[i] = CRGB::Blue;} |
| for(i=33;i<36;i++) {led_strip1[i] = CRGB::Green;} |
| for(i=36;i<39;i++) {led_strip1[i] = CRGB::Red;} |
| for(i=39;i<43;i++) {led_strip1[i] = CRGB::Cyan;} |
| FastLED.show(); |
| j=0; |
| for(k=0;k<8;k++) recv_color_str[k] = '\0'; |
| } |
| else |
| { |
| j=0; |
| for(k=0;k<8;k++) recv_color_str[k] = '\0'; |
| } |
| } |

