How to build an IR remote-operated RGB LED strip using Arduino

How to build an IR remote-operated RGB LED strip using Arduino


In the previous article from this series, we learned how to generate different colors in an RGB LED strip when using Arduino. We covered the basics in terms of how an RGB LED strip works, the types available, and how it can generate various colors. 

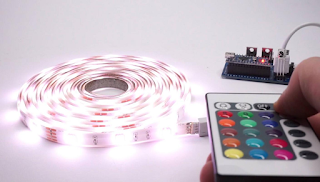
In this article, we’ll add to that knowledge base. You might already be familiar with some of the LED strips available on the market, including ones with a small remote. This IR remote operates the strip and is used to turn it on or off, change the colors, and increase or decrease the brightness, etc.

The idea for this project is similar. We’re going to build IR remote-operated RGB LED strip using Arduino. What’s interesting (and convenient) is that you can use any IR remote to operate it — including an STB or TV remote, or any other IR remote. 

So, let’s get started. First, we’ll review the circuit diagram and how it operates, followed by the program.

Circuit diagram

This circuit is built using only four components:

  • The TSPO1738 is an IR receiver (sensor) that receives remote signals (from any IR remote). It has these interfacing pins: Vcc, GND, and output. The Vcc pin receives 5V from the Arduino board. The ground pin must be connected to the common ground. And, the output pin should be connected with Arduino’s pins D2 and D3.
  • The ULN2003A is a current-driver chip with built-in Darlington pairs (7) that are used to provide current to the LED strip. It receives the same 12V supply that’s given to both the RGB strip and Arduino. Arduino analog outputs D9, D10, and D11 are connected to three of the chip’s inputs. Its corresponding outputs are connected with the strip’s R, G, and B inputs.
  • The Arduino board, ULN2003A chip, and strip all are given 12 V supply from an adapter (12V@2A).

Circuit operation

  • It’s important to first read and decode the codes from the IR remote that you plan to use. To do so, simply connect TSOP1738 with the Arduino board, as shown.
  • Next, download the library called, “IRremote” from GitHub. Copy the library into the root directory (folder) or to Arduino (C:\arduino-1.6.7\libraries). Then, you should easily be able to access the library from the Arduino IDE software as: sketch menu -> include library -> IRRemote 
  • Upload the program given here into Arduino.
  • Allow Arduino to connect to your laptop/PC through a USB cable.
  • Run the program and start the serial monitor in Arduino IDE.
  • Now, press any button from the remote that you’d like to use. You’ll see some code pop up (such as… 4 – 5 – 6 – 8 – 10 digits). Note down these codes for their respective buttons. They will also be used for controlling the strip.
  • These codes will also be used in the main program to perform different operations, such as changing the color or brightness, etc. 

Next, let’s review how the complete circuit works…

  • The IR sensor, TSOP1738, receives code from the remote and passes this message onto Arduino.
  • Arduino first decodes this message and compares it with the programmed code. 
  • If a match is found, Arduino will provide the PWM outputs on D9, D10, and D11 to generate different colors on the LED strip. For example, when any number key is pressed from the remote (1, 2, 3, etc.), Arduino will generate RED, GREEN, BLUE, etc .— the pre-programmed colors.
  • If the ‘0’ key is pressed on the remote, Arduino will generate a continuous multi-color effect. To stop this effect, you’ll need to reset the Arduino microcontroller.

Software program
Program 1: To decode the IR remote codes

#include <IRremote.h> // library for IRRemote functions
int IRpin = 3; // pin for the IR sensor
int intr_pin = 2; // interrupt pin
IRrecv irrecv(IRpin); // configure IR pin
decode_results results; // decoded codes as result
unsigned long int prev_code; // save previous code
void setup()
{
Serial.begin(9600); // initialize serial port
//////////// print message on serial monitor //////////////////
Serial.println("IR remote code decoder using interrupts");
irrecv.enableIRIn(); // Start IR receiver
//////////////// attach interrupt to pin 2 with ISR ////////////
attachInterrupt(digitalPinToInterrupt(intr_pin), receive_code, CHANGE);
}
void loop()
{
delay(200); // wait for
irrecv.resume(); // new received code
}
void receive_code()
{
if(irrecv.decode(&results)) // when code is received
{
if(prev_code != results.value) // if its new code
{
Serial.println(results.value); // display it on serial monitor
prev_code = results.value; // and save it
}
}
}

Program 2: main program

#include <IRremote.h>
#define RED 10
#define GREEN 9
#define BLUE 11
#define full_brightness 0 // because of common anode type LED
#define half_brightness 128 // 0 means LED fully ON and
#define zero_brightness 255 // 255 means LED is OFF
int IRpin = 3; // pin for the IR sensor
int intr_pin = 2;
int del = 100;
IRrecv irrecv(IRpin);
decode_results results;
unsigned long int recv_code,prev_code;
void setup()
{
int i;
Serial.begin(9600);
Serial.println("IR remote operated RGB LED");
irrecv.enableIRIn(); // Start the receiver
attachInterrupt(digitalPinToInterrupt(intr_pin), receive_code, CHANGE);
}
void loop()
{
if(results.value==2210) // replace this code with the code that
{ // have got from your remote
// red colour
analogWrite(RED,full_brightness);
analogWrite (GREEN, zero_brightness);
analogWrite(BLUE, zero_brightness);
}
if(results.value==6308)
{
//green colour
analogWrite(RED,zero_brightness);
analogWrite (GREEN, full_brightness);
analogWrite(BLUE, zero_brightness);
}
if(results.value==2215)
{
//blue colour
analogWrite(RED,zero_brightness);
analogWrite (GREEN, zero_brightness);
analogWrite(BLUE, full_brightness);
}
if(results.value==6312)
{
//yellow colour
analogWrite(RED,full_brightness);
analogWrite (GREEN, full_brightness);
analogWrite(BLUE, zero_brightness);
}
if(results.value==2219)
{
//lightgreen colour
analogWrite(RED,half_brightness);
analogWrite (GREEN, full_brightness);
analogWrite(BLUE, zero_brightness);
}
if(recv_code==6338)
{
//pink colour
analogWrite(RED,full_brightness);
analogWrite (GREEN, zero_brightness);
analogWrite(BLUE, half_brightness);
}
if(recv_code==6292)
{
//skyblue colour
analogWrite(RED,zero_brightness);
analogWrite (GREEN, full_brightness);
analogWrite(BLUE, full_brightness);
}
if(recv_code==6200)
{
rainbow_effect();
}
delay(200);
irrecv.resume();
}
void receive_code()
{
if(irrecv.decode(&results))
{
if(recv_code != results.value)
{
Serial.print("received code ");
Serial.println(results.value);
recv_code = results.value;
}
}
}
void rainbow_effect()
{
while(1)
{
// red colour
analogWrite(RED,full_brightness);
analogWrite (GREEN, zero_brightness);
analogWrite(BLUE, zero_brightness);
delay(500);
//green colour
analogWrite(RED,zero_brightness);
analogWrite (GREEN, full_brightness);
analogWrite(BLUE, zero_brightness);
delay(500);
//blue colour
analogWrite(RED,zero_brightness);
analogWrite (GREEN, zero_brightness);
analogWrite(BLUE, full_brightness);
delay(500);
//yellow colour
analogWrite(RED,full_brightness);
analogWrite (GREEN, full_brightness);
analogWrite(BLUE, zero_brightness);
delay(500);
//lightgreen colour
analogWrite(RED,half_brightness);
analogWrite (GREEN, full_brightness);
analogWrite(BLUE, zero_brightness);
delay(500);
//pink colour
analogWrite(RED,full_brightness);
analogWrite (GREEN, zero_brightness);
analogWrite(BLUE, half_brightness);
delay(500);
//skyblue colour
analogWrite(RED,zero_brightness);
analogWrite (GREEN, full_brightness);
analogWrite(BLUE, full_brightness);
delay(500);
//orange colour
analogWrite(RED,full_brightness);
analogWrite (GREEN, half_brightness);
analogWrite(BLUE, zero_brightness);
delay(500);
//magenta colour
analogWrite(RED,full_brightness);
analogWrite (GREEN, zero_brightness);
analogWrite(BLUE, full_brightness);
delay(500);
}
}
ew raw

Post a Comment (0)
Previous Post Next Post